More about photographic vision

Yesterday I wrote about my attempts to find something visually inspiring to photograph during an overcast morning in an area that is very familiar to me.

When we travel to places we have not been before, we find lots of things to photograph, whereas when we walk through our neighborhood we have a really hard time finding anything that is visually inspiring. Yet we are more prone to take cliché images in the places we travel to, because we look at other people’s work before we get there. Because we don’t live at the places we travel to, we can only get some superficial photos.

The place we live in we are intimately familiar with. Here is where we know the best places and the best light etc.

A lot of beginning landscape photographers are taught that the only “real” places for landscape photography are in the Southwest, and when one looks at photography magazines, this impression seems to be in line with this notion as well. Don’t get me wrong, it is a wonderful experience to travel and photograph in places such as Grand Canyon, Monument Valley, Zion, Bryce, Canyonlands, Antelope Canyon, Arches, Yellowstone, Yosemite,… but don’t expect to make your best photographs there. Instead become familiar with the State Park near your home.

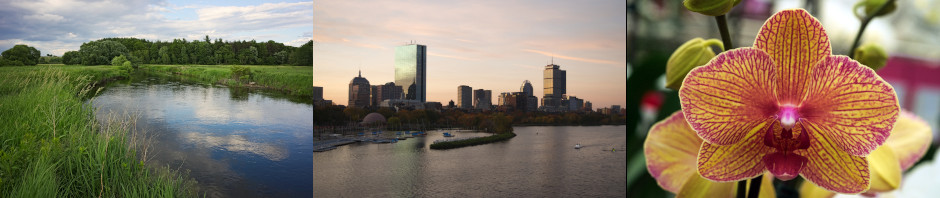
A place I have become familiar over the years is a (paved) trail from a former railway that connects the towns of Arlington-Lexington-Bedford (Massachusetts), the Minutemen Bike Trail. Every week I have the opportunity to walk on the trail. Unlike yesterday, this morning it was sunny.

The sun was gorgeous, as seen here through the building of the former train station in Lexington, MA.

I dug out my old digital SLR I got 6 years ago, because I like to try out different gear and different media (digital vs. film) for a change in pace. After processing Raw files from the old camera I was amazed how great the photos looked. I have definitely seen a large improvement in raw processor software from ~2003 when I first started using raw files. (Sorry for the discourse in technology.)

In one part on a downhill slope of the trail the morning sun perfectly hit a patch of dried plants that had a wonderful glow to it.

On the final stretch of my walk was a little creek left to the road. I suddenly noticed the ripple in the sand which made me wonder when the currently more stagnant creek was carrying enough water to form these ripples.

What do you noticed in your day-to-day environment that is unusual? I hope we can take a breath of fresh air every day and see something in our environment that is different from what we are used to seeing. This will help us to stay photographically alert.

Thanks for reading,

Lars

How to stay photographically creative

This morning I went for my weekly walk from Lexington to Bedford (Massachusetts). This winter has been extremely mild. So far we had only a little bit of snow, which melted each time within a day or tow. To top it off, this morning was overcast. Usually I like to enjoy the morning sun rays shining through trees and vegetation. Being overcast today, I knew that there was nothing to photograph, or so it seemed at first.

After getting over my frustration, I started to pay more attention, and then I saw “my” photographs. What follows now is a collection of what stood out for me this morning.

First I noticed the poison ivy roots growing on a tree and their delicate structure and coloration.

Then there were these mushrooms growing on a dead tree that were really colorful.

Next I really liked the tree reflection on the pond. Being that it was overcast, the mood of this photo just works out fine.

Just when I thought I was done, I noticed a little stream that was more stagnant than a stream, and I enjoyed the reflections of trees and the subtle color of leftover leaves from the fall in it.

These dead leaves on the branches just reflected my feelings of exhaustion and monotony this morning.

The last image I wanted to share here is an abstract image. It is the beltway that runs around our city (Rt. 128/I-95). During rush hour traffic usually looks like this. I have and continue to spend countless hours in traffic (when I am not walking to work). Sometimes I notice that I experience getting into a daze when my commute becomes very slow and I notice when I emerge out of the “slow zone”. This photo represents to me this daze I am in when traffic is not moving at all.

While I usually like to make photos that are as sharp as possible, this one taught me that on occasion the best photo may be one that is out of focus.

Are the photos I shared here my best work? Certainly not, but it showed me that when I change my attitude I can see better what is around me.

Thanks for reading,

Lars

Cool places in Boston – Copley Square Public Library

During a Sunday afternoon walk through Boston’s Back Bay we decided to go inside the Public Library building (at Copley Square). We immediately enjoyed the marble stairwell and chandeliers.

Boston’s public library is one of the largest in the country.

On the second floor I liked the main reading area with its green lamps on the tables.

On the third floor we came across this beautifully ornate room. There was also an exhibit of American prints from different artists (etchings, lithographs, and woodcut prints) that we enjoyed a lot.

I was mostly impressed by the Mediterranean style court yard. The building was completed in 1895, and designed by a famous New York architecture firm.

Right now the court yard is empty, since we are technically in the middle of winter. I am sure this place will get busy once it gets warmer.

I would love to hear of beautiful public buildings in your city. We all have seen them from the outside, but may not have seen the inside.

A Morning at the Hudson River

Recently Kim and I went to New York City for a few days. In the past, we often went through the city on our way back to Massachusetts. This time we took the Palisades Parkway on the Western shoreline of the Hudson River. Along the parkway are frequent pull-outs. We stopped at one near the NJ/NY state line. It was a beautiful morning. I also did not know that the Western shoreline has such high cliffs.
Thanks for stopping by.

Lars

A walk in Back Bay (Boston)

Recently we went for a Sunday afternoon walk in Back Back. The light for just perfect. The photo here shows the Christian Science Church in beautiful light.

More beautiful light in Back Bay with some of the well-known buildings visible.

Finally, Trinity Church and Hancock Tower. After all these years living in Boston I don’t know any more tasteful combination of old and modern architecture.

Thanks for stopping by,

Lars

Story behind the photo: Boston Christmas Tree Lighting

The Boston Christmas Tree lighting took place on December 1st on Boston Common. It was a two hour event with different performances on stage. Just before 8pm, the tree was finally lit and fireworks went off around it.

The tree lighting has a long tradition, what I did not know was the story behind the Christmas Tree Lighting. It goes back to December 6, 1917. The world was still involved in World War I. Halifax Harbor in Nova Scotia was used a lot in these days for war-related cargo shipments to and from Europe. A French ammunition ship loaded with explosives destined for Europe exploded that day when it collided with a Norwegian ship, leading to death and destruction for countless people.

While relief trains from other cities in Nova Scotia arrived later the day of the explosion, Boston sent the first relief train the night of the explosion. While heavy snowfall delayed its arrival, it arrived on December 8th at 3am. It was the beginning of a large relief effort, that later included design of the health care system in the area. This gave Boston the reputation as (outside) city that arrived first and left last.

In 1918 the city of Halifax sent Boston a Christmas tree to express gratitude for the relief effort.

In 1971, the tradition was revived and has continued since. The Christmas tree is donated by a private party, and guidelines exist for the selection of the tree. This year’s tree is from Yarmouth, Nova Scotia, and the a video of the tree cutting is available on Youtube. Thank you to the Spinney family for this beautiful tree!

Trees are often donated in memory of relatives who died in the explosion.

When I learned about the history of this tradition, it reminded me that we never know how our actions can positively affect people’s lives in the future. People in Nova Scotia still remember what people from Boston did almost 100 years ago.

Thank you for stopping by, Happy Holiday Season,

Lars

Photography: when to use film or digital

In my last post I promised to write about when I prefer to use digital and film photography, since I see both recording media as equivalent. I want to start this discussion by re-iterating that I use both recording media to about the same extent and like results from both.

I also need to clarify that when I refer to digital photography, I mean digital SLR (or some mirrorless cameras which come close in performance to a digital SLR). A comparison of digital compact camera vs. film SLR does not make sense because the high ISO and autofocus performance of the digital compact camera is not at the same level as digital SLR due to the smaller sensor and different autofocus module.

To begin, I want to highlight the strength and weaknesses of each recording medium and then mention examples where I use them.

Digital SLR

Strength Weaknesses
High ISO performance outstanding (now we can take photos in the dark)
Virtually unlimited shooting possible (no film changing after 36 exposures)
Adjustment of exposure and White Balance etc. afterwards possible with raw files
Immediate availability of data
Immediate feedback
Oftentimes heavier than film gear
Equipment relatively expensive
Requires shooting infrastructure: battery chargers, memory cards, field storage, field data backup
Dynamic range not as high as film (this gap is getting narrower)
Some colors not rendered as natural as film
With high burst rates it is easy to shoot hundreds of images, requires time to edit

…and for Film Photography

Strength Weaknesses
Equipment inexpensive
Cameras run forever on batteries
No need for field backup infrastructure
Lack of immediate feedback and availability of recorded images leads to more contemplative approach to photography
With a delay of at least one day until photos are available, allows photographer to envision an image and be surprised how different the actual photo looks in the end
Great inexpensive lenses available
High ISO photography pretty much irrelevant (highest ISO for color film was 800-1600, now difficult to get; ISO 3200 for b/w)
Not well suited for high burst events (requires frequent film changes)
Because of low ISO film, may require tripod
Delay of at least one day until photographs become available after development
No immediate feedback (this may be a strength)
Requires more steps in a digital workflow (processing – scanning – editing)

Here is my list of typical motifs for each recording medium:

Digital Photography Film Photography
Action
travel*
low light
macro overcast day
handheld telephoto shots
scientific photography
studio flash setups
all commercial wedding
event, etc. photography
zoo animals
night skiing
Flowers
fall foliage
photography during action/sports (using inexpensive equipment)
landscape
travel*
day skiing
high contrast scenes
landscape details

 * For travel photography, I don’t have any clear preference and usually take “one of each”, I try not to shoot the same motif twice.


Thanks for stopping by!

Why film still matters in photography

Recently I came across some photography technique books from 2004-2006, which I enjoyed because film and digital photography were given equal space and considered equal media. This was the time when a lot of professional photographers switched to digital photography, because the new medium was seen as mature enough. In books before this time, film photography usually is given more weight, whereas books after this time focus solely on digital photography.

I still use film on a regular basis, but of course enjoy digital photograph as well for other purposes. I have used more and more film after using digital photography for a couple of years, because film still adds certain qualities to my work that I like (this is my way of not saying “digital is better than film” or vice versa). I will write some other time for which situations I prefer digital photography, and for which film photography is better suited in my opinion.

Younger generations of photographers have never used film. In my experience, using film does enhance photographic awareness and leads to a more contemplative style. When I shoot film, I take more time composing photos, whereas with digital photography I shoot quick bursts of images that take me a while later on the computer to sort out (which of the four very similar compositions do I like the best?). Specific reasons why I think film photography is still important and will not disappear are:

  1. Film photography equipment is VERY inexpensive. – With the “digital revolution” going on, people are abandoning their trusted film cameras for new digital equipment, which has led to very inexpensive prices for all types of film gear. Now is the time to use the film camera that was not affordable 15-20 years ago. If I don’t buy equipment from eBay, my favorite store is KEH. The quality of their equipment and the prices are outstanding. There is a huge supply of inexpensive film equipment and lenses available.
  2. Film integrates perfectly into a digital workflow. – While film requires chemical processing of some sort to make the photographs visible, it is relatively easy to scan film afterwards and use the photographs in the same way as digital camera files. It is also a possibility to get scans of film done in a photo lab at the time of development. In the next couple of weeks I will post some tutorials on the different steps. Some of us may already have a film scanner, because many flatbed scanners come with a transparency adapter for film scanning and the results can be very good. Of course a dedicated film scanner can usually produce better results. The following diagram compares the workflow of film and digital photography:After scanning of film, we have a digital file that is equivalent to an image file produced with a digital camera. The same possibilities exist once the film has been scanned. By the way, I would keep the scanned film, just in case better scanning technology becomes affordable.
  3. Film renders color differently than a digital sensor. – In a digital sensor, we have an array of photosensors (i.e. for a 6 million pixel sensor (6 MP), the dimensions of the array would be 3000 x 2000 pixel). The photosensors by itself do not “see” color, which is why each is coated with a color filter, either R(ed), G(reen), or B(lue). About half of all photosensors are green-sensitive, the rest is equally divided between red and blue. The arrangement follows the so-called Bayer pattern. In the example of the 6 MP sensor, in the end the recorded image will give us a pixel at each position that has a color value for all three colors, which means that the missing two color values are interpolated from neighboring pixels. As we all know, the results of this process are very good. Film, in contrast, has a layered structure. The C(yan), M(agenta), and Y(ellow) layers are stacked on top of each other. Dyes is each layer act as color filters and later react during the development process to form permanent dyes. As you may have noticed, film follows the CMY color model, which is complementary colors to RGB. In reality I have noticed differences in the color rendition of film and digital photography. The photo of a rose bush was taken with a digital camera (left) and film (right). While I like the digitally recorded photo, I prefer the photograph recorded on film, because the colors just seem to be more life-like in my opinion. The digitally recorded photo has a little bit too much blue for my taste.

    Since blue was to strong in the digital camera image, let us reduce blue globally and see what we get:

    Now the results are a lot better than in the above image, but for my taste the colors still look cleaner in the film image. If I had only gotten the digital camera image, I would have been happy, just in comparison I think the film image looks more life-like.
  4. Medium and large format film is the affordable high resolution option for low budget shooters. – The highest resolution sensors available at the moment are for medium format camera bodies and produce up to 80 MP files and at the time of this writing cost approximately $40,000. For most people, including a good portion of professional photographers, this is not affordable. Medium and large format film gear on the other hand is very affordable. The larger than 35 mm film size provides the option for detail-enriched, high resolution scans. Medium format film size is either 6×4.5 cm, 6×6 cm, 6×7 cm, or 6×9 cam, depending on the camera used. The Mamiya M645 system I use uses the 6×4.5 cm film format. The actual recorded film size is 56×42 mm (approx. 2.20×1.65 in). While flatbed scanners have very high resolutions, for the following calculation of pixel dimensions I assume a relatively conservative resolution of 2400 dpi (dots per inch). A scanned file has the approximate dimensions of 2.2o in x 2400 dpi = 5280 pixels on the long side, and 1.65 in x 2400 dpi = 3960 pixels on the short side. Multiplication of 5280×3960 tells us the total amount of pixels, which is 20,908,800 pixels, or about 21 MP. An increase of the scanner resolution to 3600 dpi or 4800 dpi leads to even larger files. A digital camera with a comparable resolution is still very expensive. Another difference is that a film or flatbed scanner actually scans all three colors, whereas a digital camera has to interpolate two colors per photo site (see above).
  5. Film grain provides pseudo detail that is very pleasing to the eye. – Within digital images we all had to get used to the appearance of digital noise, which comes in two “flavors”: luminance noise affects all three color channels and results in loss of detail and artifacts showing, whereas chrominance noise results in the appearance of single speckles of color in otherwise uniform areas of color. Film shows a different “noise” characteristic. With a higher ISO film, the silver halide crystals need to be larger to lead to higher light sensitivity. At sufficient magnification, the intrinsic structure of film becomes apparent as grain. Grain oftentimes creates the illusion of detail. The photo posted here compares digital camera noise (left) and film grain (right). Film grain creates a texture that is more in flow with the image, whereas digital camera noise appears more disruptive to the image. Some of that perception may have to do with our experience that film has been the recording medium of choice for so long. Fortunately there is software out there to mitigate the appearance of digital camera noise and film grain. Because of the pseudo-detail structure of film, film image sometimes appear to be sharper than comparable digital camera files.
  6. Today’s films are designed to be scanned. – In the past, companies like Kodak sold variations of similar film with slightly different characteristics such as color saturation and contrast. We have already and will continue to see the number of films declining, because manufacturers streamline their lines of film to just one variation. A recent examples for this is the Kodak Portra color negative line. Kodak used to sell Portra NC for medium contrast and medium color saturation, and Portra VC for higher contrast and color saturation. With digital imaging, the need for different film response curves has vanished, because digital imaging software lets us fine tune these parameters to one’s preferences. You may wonder what happens to film people have developed and printed in drug stores (one hour photo labs) – purely optical enlargers have completely disappeared. Most stores use Fuji Frontier or Noritsu systems. Color negative film is processed in a standard C-41 process, and then the film is scanned afterwards in a high speed scanner. A quick image enhancement is applied to the scanned files and then prints are produced on a photographic printer that exposes the image onto photographic paper using LEDs or lasers. The exposed photo paper is then processed in a wet chemistry process (RA-4). This is why drug stores can accept digital camera files, it actually saves them from having to process and scan film.
  7. Film scanning and photo printing technology is mature and quick. –  About 10 years ago a company called “Applied Science Fiction” (ASF, no kidding) developed a system to eliminate scratches and dust during scanning of film. Kodak bought the company. The system is known as ICE3 or ICE4, depending on the iteration used. To eliminate dust and scratches, the film image is scanned with an infrared light source, which shows the defects in the film. An algorithm is then used to patch the defects. The results are typically very good. A lot of relatively inexpensive scanners utilize this system. Now there are also even faster systems available that use which utilize a dedicated digital camera to record an image of the film. Inkjet printing technology has mature significantly over the last couple of years. Ten years ago, I needed a six color inkjet printer to achieve photo quality results. Printed b/w was very difficult, and the results very poor. Nowadays even four color inkjet printers can produce photo quality results, while at the same time the printing speed is amazingly fast compared to the earlier printers. For b/w printing, the more expensive printers have grey inks. A less expensive alternative is to dedicate an inexpensive four color inkjet printer to b/w printing by replacing the standard inks with a grey set of inks.

Photographic materials available today provide us with unlimited possibilities, no matter whether film or digital photography is utilized. Both recording media have their place. In the end, it is information that is recorded, whether on a digital sensor or film. It is a great time to be involved in photography, because we have so many options and materials available.

Thank you for reading!

Tutorial: How to make photo notecards

Today we are featured on the Fall Crawl and present this tutorial:

This tutorial describes how to make photo notecards out of regular letter size photo paper.

What do we need?

  • An inkjet printer, pretty much any newer model will do, regardless whether is says “Photo” or not in its name. For the tutorial here, I will use an inexpensive printer from a manufacturer that starts with an E…, but I heard that printers from H… or C… produce excellent output as well.
  • Letter size (8.5″ x 11″) matte photo paper. Glossy photo paper is not suitable for this project, because it is usually not possible to write on the back of glossy photo paper. Matte photo paper usually has a paper back and works fine. We need a paper on the back to write on the inside of the notecard later.
  • Invitation envelopes 

The final note-card size (folded) is 4.25″ x 5.5″, perfect for invitation envelopes. This envelope size is readily available in the office store that has a red logo and starts with S…

  • Cutter knife, ruler, cutting mat: to cut paper stock (and not your fingers!)
  • Bone folder: alternatively a dull knife may work as well

The idea

1. We will cut the letter size sheet of photo paper in the middle:

2. We will score the middle of the two half-letter size sheets and fold them in half:

3. We print on the sheet with a 1/4″ margin all around the photo:

For most programs it is easier to print when the photo is cropped to the right aspect ratio, although photos from some cameras already have the right aspect ratio. Images from digital SLR (DSLR) cameras have an aspect ratio of 1.5 and will require cropping.

The actual process

1. Marking the middle of the letter size matter photo paper sheet with a light pencil mark (5.5″ from edge to edge).

Cutting of the sheet in half, before and after successful cutting. (No fingers were harmed in the cutting of this sheet.)

Marking the half-sheet for the scoring in the middle (4.25″ from edge to edge.)

After scoring of the paper (a dull knife, letter opener, key, screwdriver, etc. may work fine)

The folded cards, ready for printing

Unfolding the cards and loading them into the printer

Preparing of the photos for printing

For the next steps, I will use the Faststone Image Viewer, a great freeware image viewer and simple editing program for Windows available at http://www.faststone.org. Of course other image editors will work fine, I just like to use freeware programs as much as possible.

For the example here, I am using a photo from a DSLR and need to crop it to the 4:3 aspect ratio first.

After clicking on the crop icon I can set the aspect ratio to 4:3 and decide how to crop my photo.

The next step is very important: we need to rotate the photo 180° to print in the correct orientation. Again, in Faststone Image Viewer it is very easy to do.

After saving the photo, we are ready to print it. For printing, I am using Corel Paint Shop Pro X3 (which is not freeware), because I had some problems with Faststone Image Viewer to accept my custom paper size.

We first need to define the custom paper size of the note-card, which is 5.5″ wide and 8.5″ tall.

To finalize the settings, I pick “Premium Enhanced Photo Paper” or something like that, and the highest quality setting. I also like to push saturation a little bit, and set a slight hue bias. Again these settings work fine for my particular E… printer, your setup may be different.

Now I am ready to (finally) print the photo. In the print setup screen, I select a custom margin of 1/4″ on the top and left, and then set a width of 5″ for the image size, because the aspect ratio has been cropped to the correct ratio, the height shows up correctly as 3.75″.

After I can finally click on the “Print” button, the printer is finally printing. One last check of the printer status message shows that the paper size has been recorded correctly.

After a minute or two, the printed notecard emerges from the printer.

Now we only need to fold it, and stick it into the envelope until it is used.

Now that you have made some notecards, you can give them away as gift, or use them as personal notecards instead of store-purchased notecards.

Of course you can also save yourself a lot of work and just purchase notecards from our store (http://larskim.com/?wpsc_product_category=photo).

About creativity and Fall Crawl Day 5

As part of the Fall Crawl we will stop by Abby’s blog today at http://dirtontherocks.com/. Abby shares a multitude of different life experiences on her blog, highly recommended.

As the title says, I wanted to write a little bit about creativity. Lately I really enjoy b&w abstract photography, because certain patterns or textures stand out and stand out differently in b&w instead of color. This got me thinking about how others point out “creative” or “artistic” individuals as some who were somehow born with the gift of artistry. Yet at the same time, there are classes in painting, drawing, or photography available. This implies that arts can somehow be learned after all.

To confuse matters further, the term “crafts” is also used sometimes interchangeably with “arts”. We talk about “good craftsmanship” of a building for example.

The apparent contradictions are resolved by establishing two layers of function to art: on one hand the “mechanic” aspects of an art form exist such as applying brush strokes to paper, or setting the camera correctly for the next exposure. This level of mechanic proficiency is often seen as “craft”. To mature as artist, the craft aspects are first practiced consciously, and then subconsciously. Most of us have experienced a similar process when we learned to drive. We first had to pay a lot of attention of how to accelerated or brake the car. After a while it became second nature. The understanding is that we store certain processes in the cerebellum, and thus they become “second nature”. Similar to learning how to accelerate and slow down the car we need a similar comfort level with our tools in the arts. In photography it needs to become second nature what settings to put in the camera, so we can focus on what we want the photograph to be about.

But what has all of this to do with creativity? Well, our tools are just that – tools. It comes down to what we want to say using our artwork. People who have something to say are seen as “creative”, because their art work resonates with other people’s life experience, yet appears unusual and refreshing from their perspective.

I oftentimes feel that my interest (or obsession) with photography helps me in my day job as a scientist to be “creative” when it comes to understanding data or solving problems. Of course when we analyze data, we look for patterns – big surprise, in photography we look for patterns as well.

I created the photograph for today’s post on a rainy Sunday afternoon at home, when I suddenly noticed a lot of patterns in our dining room.

And one more thing: while we call our blog “Crafts and Photography”, my wife Kim’s “crafts” are very artistic and I know she is an artistic and creative person.